Sales Events allow select products to be placed on sale for a defined or open‑ended timeframe, with discounts applied automatically during invoicing. An open‑ended event works well for automatically applying discount to discontinued items that you want to move from your inventory. Each event includes a description, discount settings, reward points, and a list of included items or categories, and can be edited or deleted as needed.
Steps & Options:
- Create an Event & Add Items
- Remove Items from an Existing Event
- Edit Event Information
- Delete an Event
From the Product menu, select Sales Events.

Create an Event & Add Items

- From the toolbar, click
 .
. - Enter the event Description, Start and End Dates, and Discount (Rewards Points can be assigned in addition to or instead of a percent discount).
- Click OK to save and close the pop-up.
- Ensure the sales event is selected, then from the Product Sales Events toolbar, click
 to search and add individual items, entire categories, or product groups to the event.
 - From the Product Lookup form, select and click Add,
 drag and drop, or double-click to add items to the event.
 - When finished, click Close to close the form.

Remove Items from an Existing Event
Tip: Click the Part #, Description, Discount, Points, or Category column headers to sort by that column.
Single Item:
Right-click on an item, then select Item Delete.
Multiple Items:
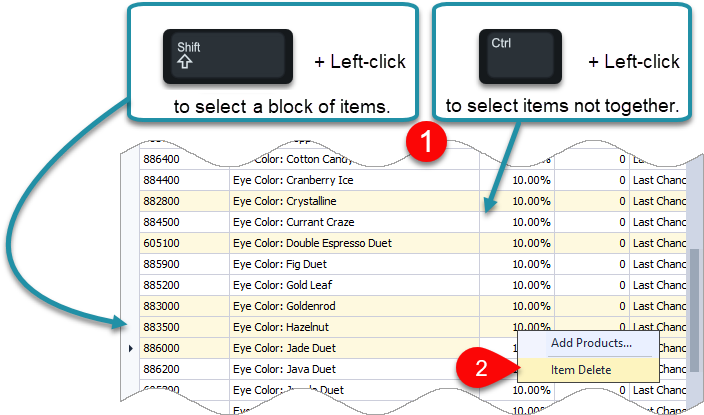
- To remove multiple items at once, left-click on an item, then hold the
 or
or  .
. - Left-click on another item, then right-click and select Item Delete. (Selected items will be removed from the selected event.)

Edit Event Information
Note: If changing the Default Discount, any items previously added to an existing Sales Event will be updated.
- Select the sales event then click
 .
. - Make any necessary changes to the Description, Start Date, End Date, Discount, or Points then click OK to accept and close the form.

Delete an Event
Warning: Deleting an entire Product Sales Event cannot be undone/reversed. Please proceed with caution.
- Select the sales event to be deleted, then click
 .
. - Click Yes to confirm and close the form.
